


There are several alternatives for creating a materials library. It is possible to purchase pre-made textures from platforms or use the free textures that many provide for download. Another option is that some software already includes a standard library, such as Corona Render, for example, which comes with the Corona Library. From these libraries, you can extract textures and apply them to materials within 3ds Max, and these libraries offer endless options that can meet your needs without any issues!
But let’s imagine that you have a client with a specific demand, and they want a material “x” for which you couldn’t find the pre-made texture to apply to your objects in the rendering. I tell you that it is indeed possible to create your own texture with quality and all the correct maps!
Textures are nothing more than the joining of several maps, that is, photos with the correct settings, which replicate a material in real life and all its parameters!
Discover the basic maps that together create a texture:
Sumário:
1 – Diffuse map for 3dsmax
Diffuse map is used in 3D computer graphics to refer to a texture map that controls how light is scattered or diffused across the surface of a 3D model. A diffuse map is often used in conjunction with other texture maps, such as specular maps, to create realistic looking material.

2 – Map of Reflect for 3dsmax

A 3D reflection map allows the user to explore different perspectives and angles of a reflective object and measure how much reflection that object will produce, that is, when light reaches it and returns after being reflected by the object in question.
3 – Glossiness map for 3dsmax
The brightness map can be used to adjust the exposure of an image, balance areas of light and shadow, or to highlight certain areas of the image. There are several image editing software that can create and visualize luminosity maps, such as Adobe Photoshop, among others.

4 – Normal Bump map for 3dsmax
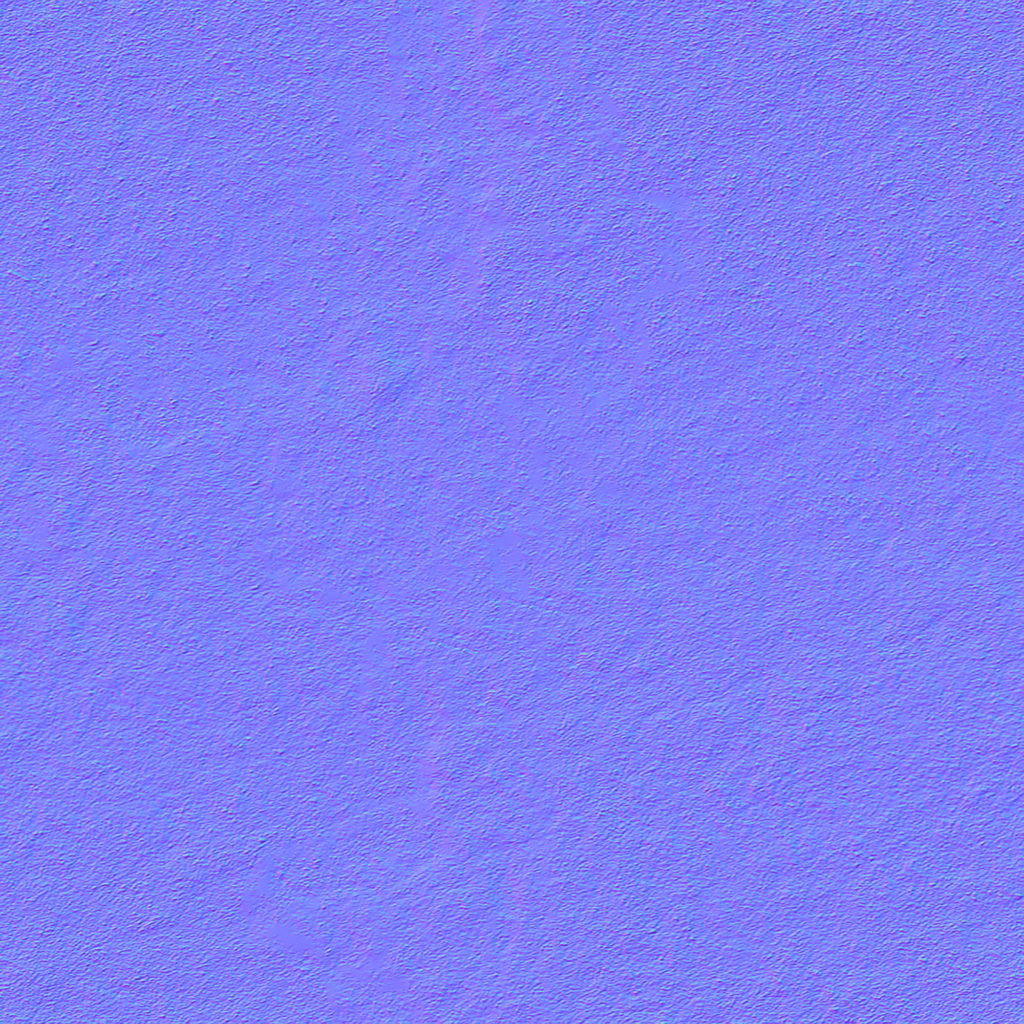
A 3D bump map is a three-dimensional representation of a surface, which uses color and shading to show differences in height and elevation in different areas. A 3D bump map can be generated using 3D modeling or rendering software, which uses shading, lighting, and texturing techniques to give the illusion of depth and volume.
5 – Displacement map for 3ds max
A 3D displacement map is a type of map that represents the displacement variation on a surface in three dimensions. Areas with larger offsets are usually shown in more intense colors, while areas with smaller offsets are darker.

All these maps, when combined into a single image to form a texture, are layered on top of each other, and each one regulates its own function, brightness, level, and reflection, thus bringing more realism to 3D textures for rendering!
Did you like this content? Consider joining our groups and following us on social media to receive much more about architecture, software, and rendering!
Do you like the content? Follow more about, see the next blogs!


Somos um escritório de Arquitetura e Design de Interiores REMOTO que surgiu em 2023 do desejo de eternizar memórias e experiências com pequenos detalhes que fazem toda a diferença.