The UVW Map is a modifier within 3ds Max that is applied to objects that will receive a texture. It performs the mapping of the texture, determining how it should behave on a specific object/surface. Essentially, it is a way to associate a 2D texture with a 3D object.
The UVW mapping process involves creating a UVW grid on the surface of the 3D object, where each point on the grid corresponds to a point on the 2D texture.
Adjusting the points on the grid is necessary to ensure that the texture is displayed correctly on the object’s surface, taking into account the distortion that occurs when stretching a 2D texture over a 3D surface. The surface can have various shapes, such as curved or planar, and its shape affects how the texture will appear.
The term “UVW” is an abbreviation for the coordinates used in the mapping process: “U” corresponds to the horizontal coordinate, “V” corresponds to the vertical coordinate, and “W” is an additional coordinate used for 3D textures. Together, these coordinates provide a complete texture map that can be applied to the 3D object.
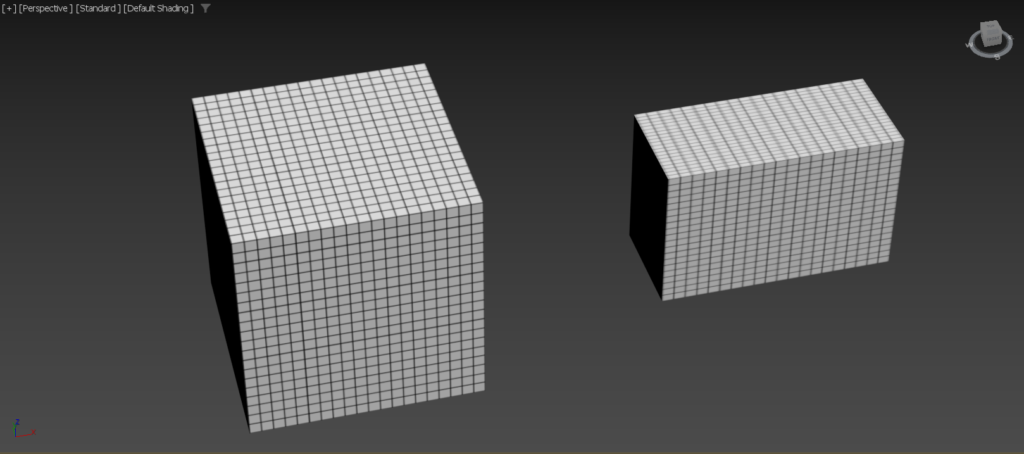
For example, take a look at the image below. In the object on the left, where all sides are equal, the texture behaves uniformly. However, in the Box on the right, where the sides are different, the texture tends to distort and stretch according to the shape of the object.

Sumário:
But how to apply the UVW Map to an object?
To understand how to apply the UVW Map, let’s exemplify it in 3 different surfaces: How it behaves in a sphere, in a cylinder and in an “L” shape.
1- On an “L” shaped surface:
See the video below:
With the object selected, go to the side panel in the Modifier List and search for UVW Map. Once this option is selected, the mapping parameters will appear, and you can choose the options based on the object’s shape. In this case, the best fit is the box, which ensures that the texture behaves uniformly on all sides in the shape of a box.
After selecting this option, it is also important to change the height, width, and length. To make it work, set the same value for all three dimensions. In this example, it was set to 100x100x100cm. If you wanted the texture to appear larger or smaller, you would simply decrease or increase this number, but having the same measurement on all sides ensures uniformity.
2- In a cylinder:
Another easy and quick way to activate the UVW Map is through the top toolbar of 3ds Max, where you can find the Modifiers tab → UV Coordinates → UVW Map.
Once again, the mapping parameters will appear, but this time, instead of Box, you should select Cylinder to adapt to the shape. It is also important to enable the Cap button ▢ next to it, as it will ensure that the texture aligns to the top as well.
Here is the step-by-step process:
In this case, it is necessary to apply a scale (only to the texture, not the object). To do this, select the UVWMap gizmo, which will modify only the texture. Then, select the Scale option in the top toolbar of 3ds Max and adjust it to the desired size.
Remember to turn off the gizmo and deselect the UVW Map when you’re finished to avoid accidentally modifying anything else.
3- In a sphere:
In the case of a sphere, the idea is the same, the only difference is that you select the spherical option in the mapping parameters.
It is also worth mentioning that with the gizmo selected, besides moving the texture, you can also rotate it, as demonstrated in the video above.
If you enjoyed this content, keep following us as we have new content every day!
Do you like the content? Follow more about, see the next blogs!


Somos um escritório de Arquitetura e Design de Interiores REMOTO que surgiu em 2023 do desejo de eternizar memórias e experiências com pequenos detalhes que fazem toda a diferença.

